5 Archery Tips for Instant Results
Posted 2017-08-18T11:39:00Z by
Perfection Is a Path, Not a Destination
")
No archer achieves a state of absolute perfection. There are too many steps in a complicated process and too many details to juggle during each shot. Even the archer with perfect coaching and perfect shooting form must deal with the mental aspects of shooting a bow.
You can master the most basic fundamentals of shooting form and understand the mental aspects. But beyond that, the majority of bow-shooting difficulties stem from only five elements of the shot sequence. Take them seriously, and they'll provide a boost in bowhunting accuracy.
1. Anchor Twice
A rock-solid anchor is the foundation of a perfectly executed shot. Anchoring creates the bases of the rear of the sighting system. Without a solid anchor point, shots become unsteady and aiming is more challenging. This invites inconsistencies to your shooting. The anchor point you choose is based on personal preferences and individual comfort. The anchor point should also be rooted in something immoveable. Cheek, jawbones or teeth are quality anchor bases. They're fixed and solid. Malleable anchor bases such as lips, jowls and sideburns are poor choices.
")
To take it one step further, an anchor point shouldn't involve just one immoveable point ... but two immoveable points. This gives you a two-point anchor assuring your shooting hand is placed "just so" during each and every shot. For instance, I snug my index-finger knuckle tightly into the divot behind my ear, and my thumb wraps around the lowermost point of my jawbone. Choose a method that works best for you.
A kisser button is another trick that serves the same purpose. It provides an additional anchor and assures your anchor routine is consistent and repeatable. It assures your bow fits properly. A draw length that is too long can introduce a floating anchor. Get your drawing hand to the middle of your face, and adopt a dual-point anchoring system. Your anchor will become more consistent and your releases will be more controlled.
2. Watch That Bubble
Most quality bow sights include an incorporated bubble level. Particularly for bowhunters, levels help eliminate left-right misses, especially from treestands or in broken topography. When shooting peep and sights, any deviations from vertical plumb cause the rest/arrow to swing left or right and send arrows off center. Canting a bow top-limb right — a common symptom for right-handed shooters — is instigated by loaded quivers. This causes arrows to miss the mark. The level acts as a reference, assuring each shot is launched consistently.
Trophy Ridge React Sight
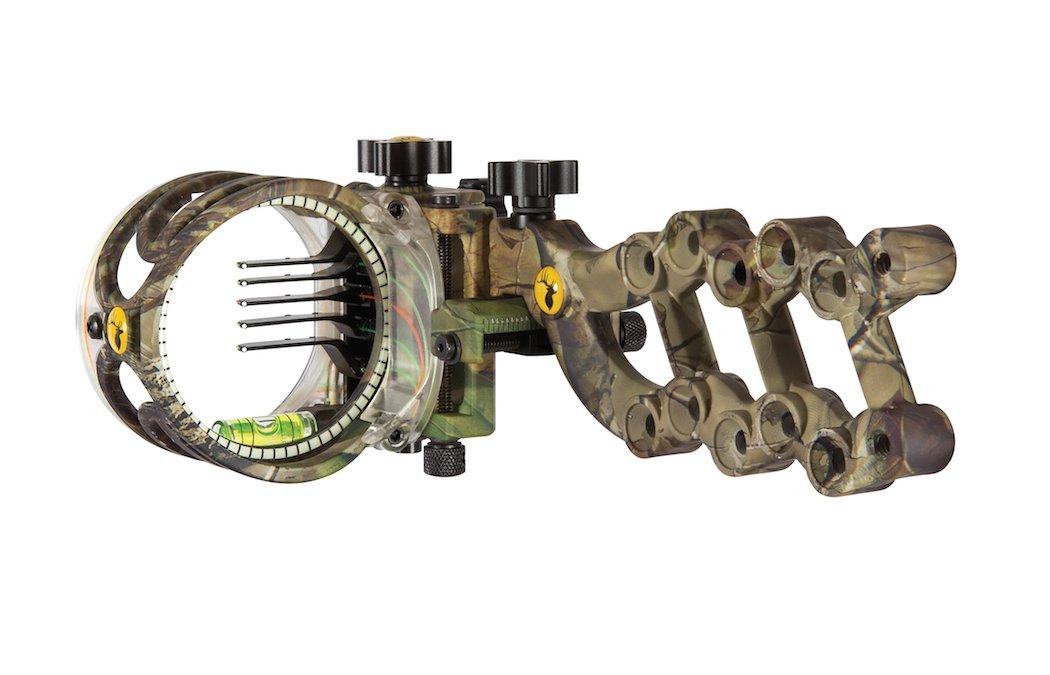
React Technology from Trophy Ridge requires sighting only 20- and 30-yard pins. The 40-, 50- and 60-yard pins will automatically set. This provides 100 percent confidence in longer pin settings. Lightweight Balistix CoPoloymer construction also reduces torque and boosts accuracy. Look for it in Realtree patterns.
A quickly developing shot opportunity may leave no time for a bubble check. This is why it's important to instill these habits during practice. Consult the level before every shot. After a while, the correct feel will become second nature.
That said, smart bowhunters at least glance at their bubble levels during challenging shots from treestands, in uneven terrain, or for ranges past 40 yards. Severely bending at the waist to address targets below you easily introduces a canted bow. Fast-falling terrain can create the optical illusion of a level bow, when you're actually tilting into the bow uphill. The longer the shot, the more deviations are compounded. It's always worth the extra second to check your bubble. You don't want to miss — or wound — a season-making animal due to a leaning bow.
3. Cradle It
A proper bow grip goes hand-in-hand with the bubble-level concept. Avoid the term grip in relation to holding the bow at full draw. The bow handle should never be gripped at all. Physically wrapping your hand around the handle to manipulate its attitude results in torque. Torque is the enemy of repeatable accuracy.
There's a better approach: Put all your fingers together and hold them vertically, as if offering your hand for a shake. Create a U with your thumb. Slide the bow handle into the U and allow it to cradle atop your fingers and thumb. You're not holding the bow at all. Gravity does all the work. Come to full draw and turn your fingers slightly outward. This pushes the heel of your hand into the riser. The draw weight pushes down your solid skeletal structure so muscles remain relaxed. This allows a steadier sight picture and a more solid shooting platform.
")
Don't Miss: New Bow Accessories for 2017
There are two important caveats: Your bow should sit up straight at rest and full draw without any manipulation on your part. This will require auditioning various stabilizers to discover the right feel. I find this is made easier by removing bow quivers and adopting a back quiver like Rancho Safari's Catquiver line. Use the bow as engineered to be shot.
Adopt a wrist sling and adjust it properly. The wrist sling eliminates the fear of dropping your bow on release or snatching at it during the shot in a subconscious attempt to prevent losing control of it. Many leave their wrist slings loose to slip their hand in when hurried. But without actual support, the purpose of the wrist sling is largely defeated. Adjust it to support the bow.
4. Surprise Release
Punching the release trigger is a common mistake. An example: The archer aims while the trigger finger is poised over the trigger, like a coiled snake. He then yanks the trigger when the proper pin sweeps into the bullseye. This leads to even bigger problems, such as shot anxiety and target panic.
If using an index-finger release, shorten the extension shank so the jaws hit the first joint of an open palm. At full draw, the trigger should hit the middle joint, instead of the sensitive tip. While triggering, use all fingers as a single unit. This gives you more control and allows you to squeeze more effectively. Aim and allow your sight pin to float over the bullseye. Deliberately create a figure-8 if necessary. Continue to aim. Concentrate on allowing the pin to float and slowly increase trigger pressure until the arrow releases.
If trigger-punching habits are bad, ditch the index finger release and use a thumb-activated T-handle release. The shot sequence is the same. It allows the pin to float on the bullseye while aiming. But this time, carefully wrap your thumb around the trigger barrel and pull into the draw to release the arrow. You're not physically squeezing the shot, but slowly pulling your shoulder blades together to increase the pressure on the limbs against the cam's draw stops. The draw pressure pulls the trigger barrel into your stationary thumb. This is a true, back-tension surprise release. This method eliminates anxiety and allows you to concentrate on aiming, and it will make you a better shot.
5. Follow Through
")
Don't Miss: 5 Bows Under $700 for 2017
Are you a deer hunter thirsty for knowledge? Check out our stories, videos and hard-hitting how-to's on deer hunting.


